
Not long ago I had another site in addition to this one. For some reason I decided to join that second site to this site as a separate section. Besides, that other site appeared even earlier and had several hundred articles, divided into a dozen of categories, as well as about fifty registered users. There was not less info on this site by the time. Objective: to transfer content to another site so as to create a unified structure.
I found an excellent component J2XML, created just for such a task. It's free and has flexible settings. It exports related structure of articles, categories and users from a donor site and integrates it into the structure of an acceptor site. It can also transfer pictures in articles as well as WebLinks. The transfer, as its name implies, is carried out through XML-files. The goal of this article is detailed examination of settings and functionality of the component J2XML.
First of all I would traditionally remind you to backup your files and database before any changes. I would also recommend to save intermediate results and do everything first on a local web server.
And now let's get started.
Download the latest version of the J2XML package corresponding to your version of the CMS from a developer site (at the time of this writing it's 3.1.rc2). Both my sites were running Joomla 2.5, this option is considered here. I'll just note that before the process I synced versions of builds by updating them at both sites to the latest ones (at time of writing - 2.5.16).
Let's agree about the terminology at the same time. Website, information from which is exported, I will call source site, and the one where the import is performed - destination site. Terms donor and acceptor seem to be too abstruse in this context )).
I. Exports from the source site
Open administration service of the source site. There do the following.
- Install the package in a standard way through Extension Manager -> Install. Now if you click on the Manage tab, you can see as many as five extensions: package installer, component and 3 more - library, J2XML Export/Send buttons plugin and a command line interface J2XML CLI.

The last of the three do not come in handy to us, but the other two can be updated if there are newer versions on the official site. Then enable the plugin J2XML Export/Send buttons.

- Go to the component itself, click the Options and configure them in accordance with our goals.
In the source site we are interested in only the first tab of the options:
- Export. It contains the following options:
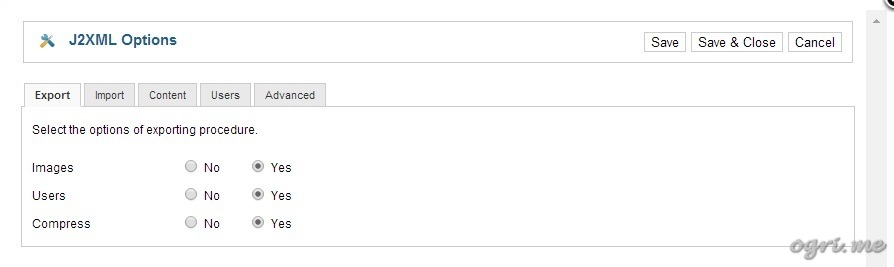
- Images - whether or not to transfer images in the articles. If you keep the default 'Yes', then the encrypted images will be included in the xml-file and will be decrypted and placed to appropriate folders later at the destination site. If there are no folders there, they will be created. Possible disadvantage here is the size of the resulting file. If there are many large images - even compression will not help. I did not have many huge pictures, so I left this option active. In the opposite case it is better to transfer article images manually little by little.
- Users - agree. In this case, the user accounts will be added to the file, though not all of them, but only authors of the articles selected for transfer. More details - in the description of the Keep author option in the Content tab on the destination website.
- Compress - whether to compress the file. It makes sense when a large amount of information is being transferred.
- Export. It contains the following options:
- Click Save & Close, and then - Article Manager. The Export button appeared in a button bar of the Article Manager interface.
- Choose 'All' in the dropdown menu Display # under the list of articles. Select articles to transfer, or select all and remove checkmarks from the articles you do not need to transfer. Click Export. The file is being generated and downloaded. It contains selected articles with all settings; accounts of users-authors; and also categories, but again - not all of them, but only those which are relevant to the exported articles.
- If there is a desire or need to transfer additional categories and/or users, go to the Category Manager and User Manager (they also have now a button Export), and export them as needed. To import users there are separate settings, which can be afterwards set up on the destination site. Also, if you use the Weblinks component, keep in mind that J2XML allows you to transfer them as well - Export button is present in the Web Links Manager too.
II. Import to the destination site
Go to the destination site. In its administration service do the following.
- Installation of the package and entrance to Options - just like on the source site. Configure settings for import.
- Export tab, of course, is not interesting us here. Let's look at the settings in other tabs.
- Import tab:

Everything is clear enough here. Whether to import images, categories, users, and links. Which parameter values to choose - can be decided by the analysis of the content of both sites. Also, these values ŌĆŗŌĆŗmust be combined with certain parameters from the next tab. Let's consider it in detail.
- Content tab contains the following options:

- Keep Ids - a very important parameter. If the site-receiver, as in my case, already has its own content, it is better to leave 'No'. In this case, the identifiers of all imported elements are added to the existing on the principle of autoincrement. Then the parameters of the Import tab are ignored, except for those you assigned a value of 'No' - then the corresponding groups are just skipped. Overwriting of the existing content occurs only if the Ids are being kept.
My goal is just to add new elements while saving existing ones. That's why I left the values of the options in the Import tab as they are by default, as well as Keep Ids - 'No'.
- Access Level. Depends on your desire. You can reset the level of access for all added articles to any one common,or you can keep the original level. I accepted the second option.
- State - published or not. Here is the same logic. I preserved its original value.
- Keep author - if 'Yes', it retains info about articles' authors, last modification date and the number of revisions. At the same time, if at the source site Users were selected in the Export tab, here will be added accounts of users - authors of articles. Whether user accounts with the same identifiers will be replaced - depends on the choice of Keep Ids above, as well as on the value of the Users parameter in the Import tab. It is interesting that the algorithm considers the user's email as an identifier too.
I have left value of this option as the default 'Yes'.
- Keep category - 'Yes'. In this case, categories corresponding to the articles will automatically be added to the list of categories. And again - whether to overwrite existing, if such are found, depends on the values ŌĆŗŌĆŗof Keep Ids and of the Categories parameter in the previous tab.
- Category - is used only if Keep category is set to 'Force to'. The selected category, respectively, is assigned to all articles.
- The remaining four parameters do not require a detailed explanation - whether to keep attributes, metadata and ratings, as well as featured articles.
- Keep Ids - a very important parameter. If the site-receiver, as in my case, already has its own content, it is better to leave 'No'. In this case, the identifiers of all imported elements are added to the existing on the principle of autoincrement. Then the parameters of the Import tab are ignored, except for those you assigned a value of 'No' - then the corresponding groups are just skipped. Overwriting of the existing content occurs only if the Ids are being kept.
- Next tab - Users.
Useful only if user accounts from User Manager in the source site were exported in a separate file. There are only two parameters that can be left by default:
- Keep Ids - 'No', as for the content.
- Keep attribs - it makes sense to keep attributes of added users, unless there are specific reasons in favor of the opposite choice.
- Finally, the last tab Advanced
can be safely ignored. Debug is disabled, Remote folder is not used in the described method.
So, as you can see, all parameters satisfied me with their default values. Cases where it would be appropriate to change them, I tried to mention above.
- Now only import itself remained. Click Choose File, select your xml-file and click Open, and then - click Import. Wait until the end of the procedure and obtain a log of its execution. If the settings matched the idea, the result should be successful.
- If the export of users, categories and links, unrelated to articles, has been done separately - repeat the previous step for appropriate files.
What can I note in conclusion? The component works excellent - quickly and without glitches. If it had transferred menus as well - it would be quite good. Also there is no possibility to synchronize third-party extensions, related to identifiers of the transferred elements. For example, users on the site-receiver got new IDs, and I had to bind comments of registered users in JComments to them manually. They were few - around 30, but what if there are hundreds of them? I would have to search for a script to transfer them, or even to write it by myself. Why the developers do not do this, JComments is one of the most popular extensions, isn't it? Besides, this script is not seem to be difficult.
But if to say without perfectionism - many thanks to developers of J2XML - free, handy, fast and reliable component for transferring content from one site to another and competent integration of this new content into the existing structure.
-
Tuesday, 21 July 2020 03:18
Joomla 3: Redirect to same page after successful login -
Saturday, 30 December 2017 16:11
Joomla: how to add your own language constants or override existing ones -
Thursday, 30 November 2017 23:27
Joomla: Integrate reCAPTCHA v2 (NO CAPTCHA) into JComments -
Saturday, 25 June 2016 15:33
Unified filtering of mod_jcomments_latest module's output -
Thursday, 17 September 2015 16:23
Post an illustrated Joomla-site article on Facebook using OG-tags
- Migrating from Joomla 1.5 to Joomla 2.5. Part 2-1. Transferring jDownloads and jComments
- Joomla: Integrate reCAPTCHA v2 (NO CAPTCHA) into JComments
- Migrating from Joomla 1.5 to Joomla 2.5. Part 2-2. Template, editor, and other extensions
- Custom 404 error page in Joomla 2.5
- Editing animated GIF-images in Photoshop CS3
-
Custom 404 error page in Joomla 2.5
-
 02.11.2020 08:17
Noot spamming but wanted to say this is hugely useful!
02.11.2020 08:17
Noot spamming but wanted to say this is hugely useful!
-
-
Joomla: Merge two sites into one using component J2XML
-
 24.08.2020 03:52
you are in point of fact a excellent webmaster. The web site loading pace is incredible. It kind ...
24.08.2020 03:52
you are in point of fact a excellent webmaster. The web site loading pace is incredible. It kind ...
-
-
Joomla: how to add your own language constants or override existing ones
-
 29.10.2020 11:33
Is this a free template that you are using as I really love it. As a website desugner myself I hope that ...
29.10.2020 11:33
Is this a free template that you are using as I really love it. As a website desugner myself I hope that ...
-
 02.10.2020 00:07
Love this site keep up the good work!
02.10.2020 00:07
Love this site keep up the good work!
-
-
Migrating from Joomla 1.5 to Joomla 2.5. Epilogue
-
 11.02.2021 06:17
HELP. I can't write a comment without the page freezing.
11.02.2021 06:17
HELP. I can't write a comment without the page freezing.
-
-
Migrating from Joomla 1.5 to Joomla 2.5. Part 2-1. Transferring jDownloads and jComments
-
 14.12.2020 08:49
I cant stomach this person so sorry x
14.12.2020 08:49
I cant stomach this person so sorry x
-
 30.10.2020 15:43
Once again, great resource for us newbs.
30.10.2020 15:43
Once again, great resource for us newbs.
-
 30.09.2020 12:58
Is commenting still open?
30.09.2020 12:58
Is commenting still open?
-
 21.08.2020 13:12
Hi, all is going perfectly here and ofcourse every one is sharing information, that's really excellent ...
21.08.2020 13:12
Hi, all is going perfectly here and ofcourse every one is sharing information, that's really excellent ...
-
-
Unified filtering of mod_jcomments_latest module's output
-
 03.12.2021 21:37
This web site definitely has all of the info I wanted about this subject and didn't know who to ask.
03.12.2021 21:37
This web site definitely has all of the info I wanted about this subject and didn't know who to ask.
-
Comments
I am very interested in your article as I am trying to use J2XML and there is virtually NO documentation provided and this quite thorough and understandable.
On Helios' website he says you must have at least one website published for the export button to show. This is correct, although it is a 'send button' in Joomla 3.3.6. You give no instructions on how to set up a website in J2XML. How did you do it without the website setup? What is the 'server'??? What username and password should you use? Are they linked to the server, whatever it is, or are they random ones? Do you know? Love to hear your comments.
Thanks
Jenny
Sorry for the late response. As a matter of fact, you do not have to configure your web site in some special way to use J2XML. At your EXISTING SOURCE SITE just: install the package in Extension Manager, update extensions if they have newer versions, enable the Export/Send button in plugins, select the export options and do the export of desired sections of your site. You will receive one or more .xml files containing the data to transfer. Then login to admin service of your EXISTING DESTINATION SITE, install and update the J2XML package there, configure import settings and do the import of the previously exported .xml file(s).
All these actions are described in the article step by step in details. Login to both source and destination sites' admin panels using username and password of their Admin user accounts. They're not linked to the server. In the article, I mentioned "server" only to emphasize that it might be good idea to do it first on a LOCAL web server and to check if results are completely match your goal, and only then to execute the export on the real web hosting.
The web site loading pace is incredible. It kind of feels that you
are doing any unique trick. In addition, The
contents are masterpiece. you've performed a fantastic job in this matter!