ADBLOCK_MSG
Migrating from Joomla 1.5 to Joomla 2.5. Part 1. Transferring contentPublished: Saturday, 09 March 2013 20:06 Written by Ogri Hits: 39391
Migrating from Joomla 1.5 to Joomla 2.5
Introduction
1. Transferring content
2. Transferring extensions:
2.1. jDownloads and jComments
2.2. Template, editor, and other extensions
Epilogue
Attention! Before you read this article and follow the instructions outlined therein, be sure to read the Introduction!
I took advantage of a known component jUpgrade. At that time, it was the latest version 2.5.2. I've been keeping to use it, although at the time of this writing, they have already released 3.0 PRO, radically different from 2.5.2. I tried it, but abandoned after a couple of failed attempts to run. Functionality of the previous one still suits me, at least for the options that I have used. Why I refused to transfer third-party extensions with the same utility, I tried to justify in the introduction. And the couple of bugs that came across on the road do not bother, if you know the easy ways to get around them. What is all about - it will be clear from the following description.
JUpgrade can be downloaded from the manufacturer's website - http://redcomponent.com. Both regular and PRO are free, only subscription for maintanance costs money.
If someone wants to try to deal with the PRO version of jUpgrade, please inform about the results.
So, what you need to have before starting the process:
- Archive of the component jUpgrade - com_jupgrade-2.5.2.zip.
- Archive with the latest release of Joomla 2.5. You can download it from the official community site or many other places. At the time of this writing, it'is Joomla_2.5.9-Stable-Full_Package.zip.
Assume that the source directory of the 1.5 site is - site1_5, data is located in the database with the name db1_5, table prefix - jos_. We place the new site in a folder site2_5, name its database db2_5, the prefix in this example will be - aaaaa_. Let's go!
- Create a subfolder site2_5 in the original site folder site1_5.
- Unpack the archive Joomla_2.5.X-Stable-Full_Package.zip into the folder site2_5.
- Install Joomla 2.5 with database db2_5 and prefix aaaaa_. Ignore the request to delete the directory 'installation'!
- Login to the administration service of the old site site1_5.
- Install component jUpgrade standard way via Extensions -> Extension Manager -> Install.
- Go to Extensions -> Plugin Manager. Find the plugin System - Mootools Upgrade. If it is turned off - turn it on, as it's required to operate jUpgrade.
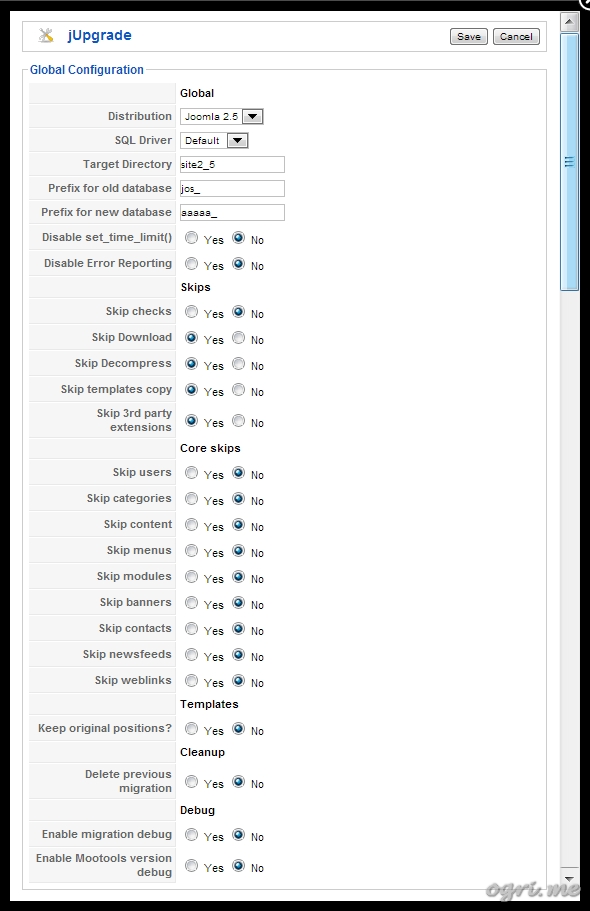
- Open the Components menu and select jUpgrade. Click the Parameters button in the upper-right corner. Configure like the screenshot below:

Fill in fields Target Directory, Prefix for old database, and Prefix for new database in accordance with our parameters. Disable Error Reporting - leave 'No' to receive informative messages on unsuccessful attempts, and they, as we will see below, will take place. Choose Skip Download and Skip Decompress as we have already prepared the new site folder and installed there Joomla 2.5. We don't port templates and third-party extensions for reasons given above. We transfer only data; for that we answer 'No' to skip migrating for all items in the section Core skips. Delete previous migration - definitive 'No', otherwise jUpgrade will overwrite our folder site2_5.
- Click Save.
Before clicking Start Upgrade, learn how to overcome two bugs in this version of jUpgrade.
Such a strange thing: when you start upgrade process for the very first time, jUpgrade somehow ignores our requirement to skip download and decompression as we specified in the settings, and begins to diligently execute them. The screenshot shows the the start of downloading progress:

For the fun of the thing I accomplished the process once. It turned out that jUpgrade found and downloaded some far from the latest version, it seems 2.5.3, and replaced already installed by my 2.5.9 with it. At that, I emphasize, it shows independent activity only on the first run after installation. So we press the Back button and then click Start Upgrade again. Now downloading and unpacking are being really skipped:

But now a new trouble is detected. Step Upgrading outputs the result 'Migrating undefined'. Due to active option to receive error messages, we can see the continuous appearance of Warnings ąĖ Fatal Errors.
The solution was found at the forum of the component's site in this tread, and a user with the nick Gerald had been found it. It comes down to replacing of line 43
$jconfig->db_type = 'mysqli';with
$jconfig->db_type = 'mysql';in the file administrator/components/com_jupgrade/includes/install_config.php. This is another evident bug of jUpgrade, they do not check the SQL Driver setting, and choosing of MySql in the appropriate dropbox of the Settings dialog does not work, we have to forcedly change it. Gerald, thank you!
Therefore, after setting parameters perform the following two steps:
- Change the code of the file
install_config.phpas described above. - Run Start Upgrade and immediately click the Back button.
Now the restive jUpgrade is under conrol, and you can expect it to correctly perform the task.
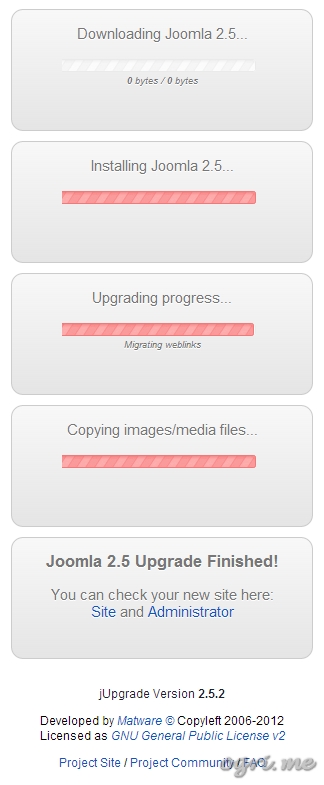
- Re-run Start Upgrade. This time the process should go smoothly and be completed with the message 'Joomla 2.5 Upgrade Finished!':

Hence we moved user accounts and contacts, menu structures, categories and articles, as well as banners, web links, and RSS-feeds from the old database to the new one. In addition, jUpgrade copied folder images, renaming the original to images.orig. At the same time, it did not update folder media despite the message 'Copying images/media files'. Apparently, it was meant that media-files are also stored in the images folder. Therefore, if you have important files in other folders - it's time to copy them to the new site.
Now you can open the new site and its admin service and find there a data from the old one. Making sure that everything is in there, you can remove the folder installation, and to move the site folder to the right location.
So, the new site received familiar content. You can proceed to install extensions and transfer their settings and data. I will focus on this issue in the later articles of these series.

