
As I noted in an article about editing of animated GIFs, I am not an expert on Photoshop. However, having examined some image processing scenarios I successfully use them. For example, when I opened galleries of two nearest and dearest to me young artists here on the site, I had attended to the method submitted in the headline of the article. Will describe the problem more clearly.
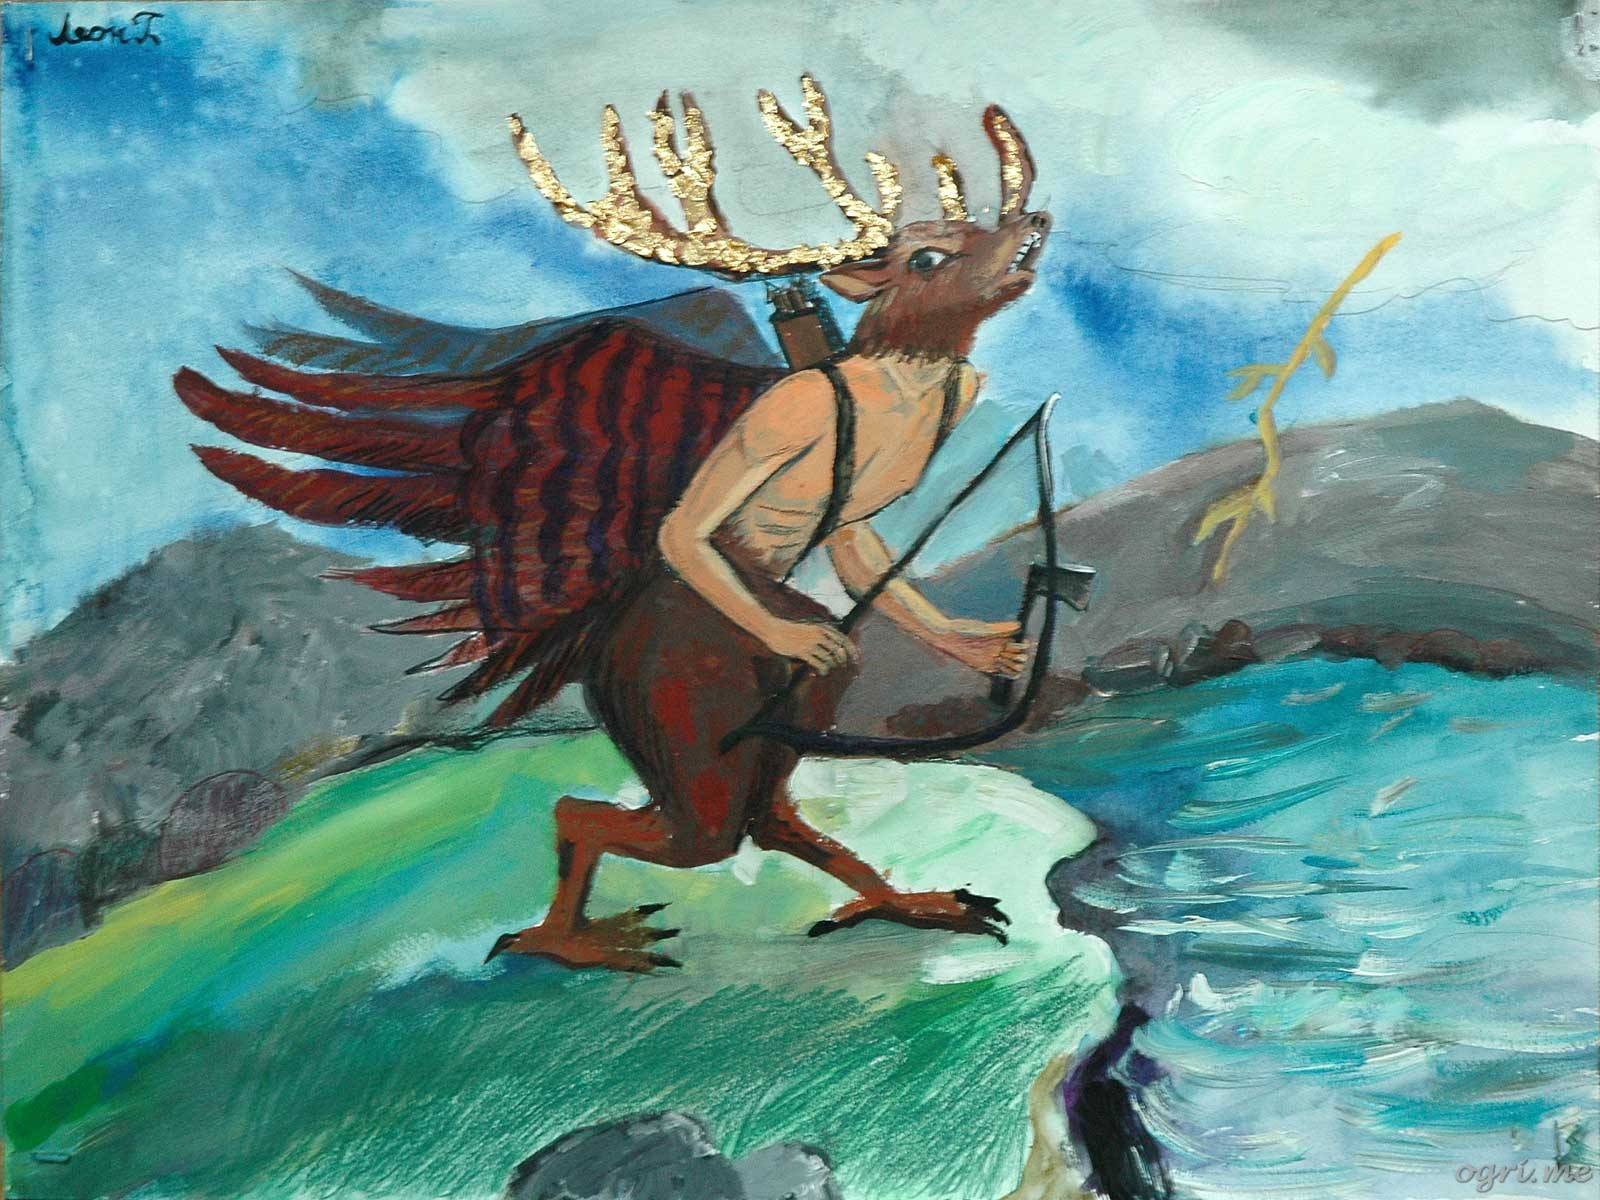
Initially: there is a photograph of a painting. In its original form, it does not suitable for posting on the website:

Expected result:
Sequence of operations allowing you to transform former into the latter is being put to the agenda today. Screenshots are clickable.
So, step by step:
Open the file in Photoshop. For convenience of work scale the image. Activate Zoom Tool, then right-click on the picture and choose Fit on Screen (or click the Fit Screen button on the appeared toolbar at the top).
If rulers are not visible in the application interface, choose View > Rulers in the main menu (or press Ctrl+R). Click one by one on the vertical and horizontal ruler and drag the cursor to the corners closest to the picture's edges - top and bottom, left and right. Release the left mouse button, placing blue line there. As a result, they will frame yet distorted image of the painting:

Click on the Rectangular Marquee Tool in the toolbar (or just press the M key). Select the area around the rectangle formed by the intersection of blue lines so that the distance between the corners of selection and the corners of the blue rectangle would be short:

Right click on the picture and select Free Transform (or select Edit > Free Transform in the main menu, or use the Ctrl+T accelerator).
Right-click again, choose Distort (those who prefer the main menu, go to Edit > Transform > Distort).
Drag the small squares at the corners of your selection to overlap corners of the painting in the photo with crossing points of blue lines. Try to distort the image minimally while doing that:
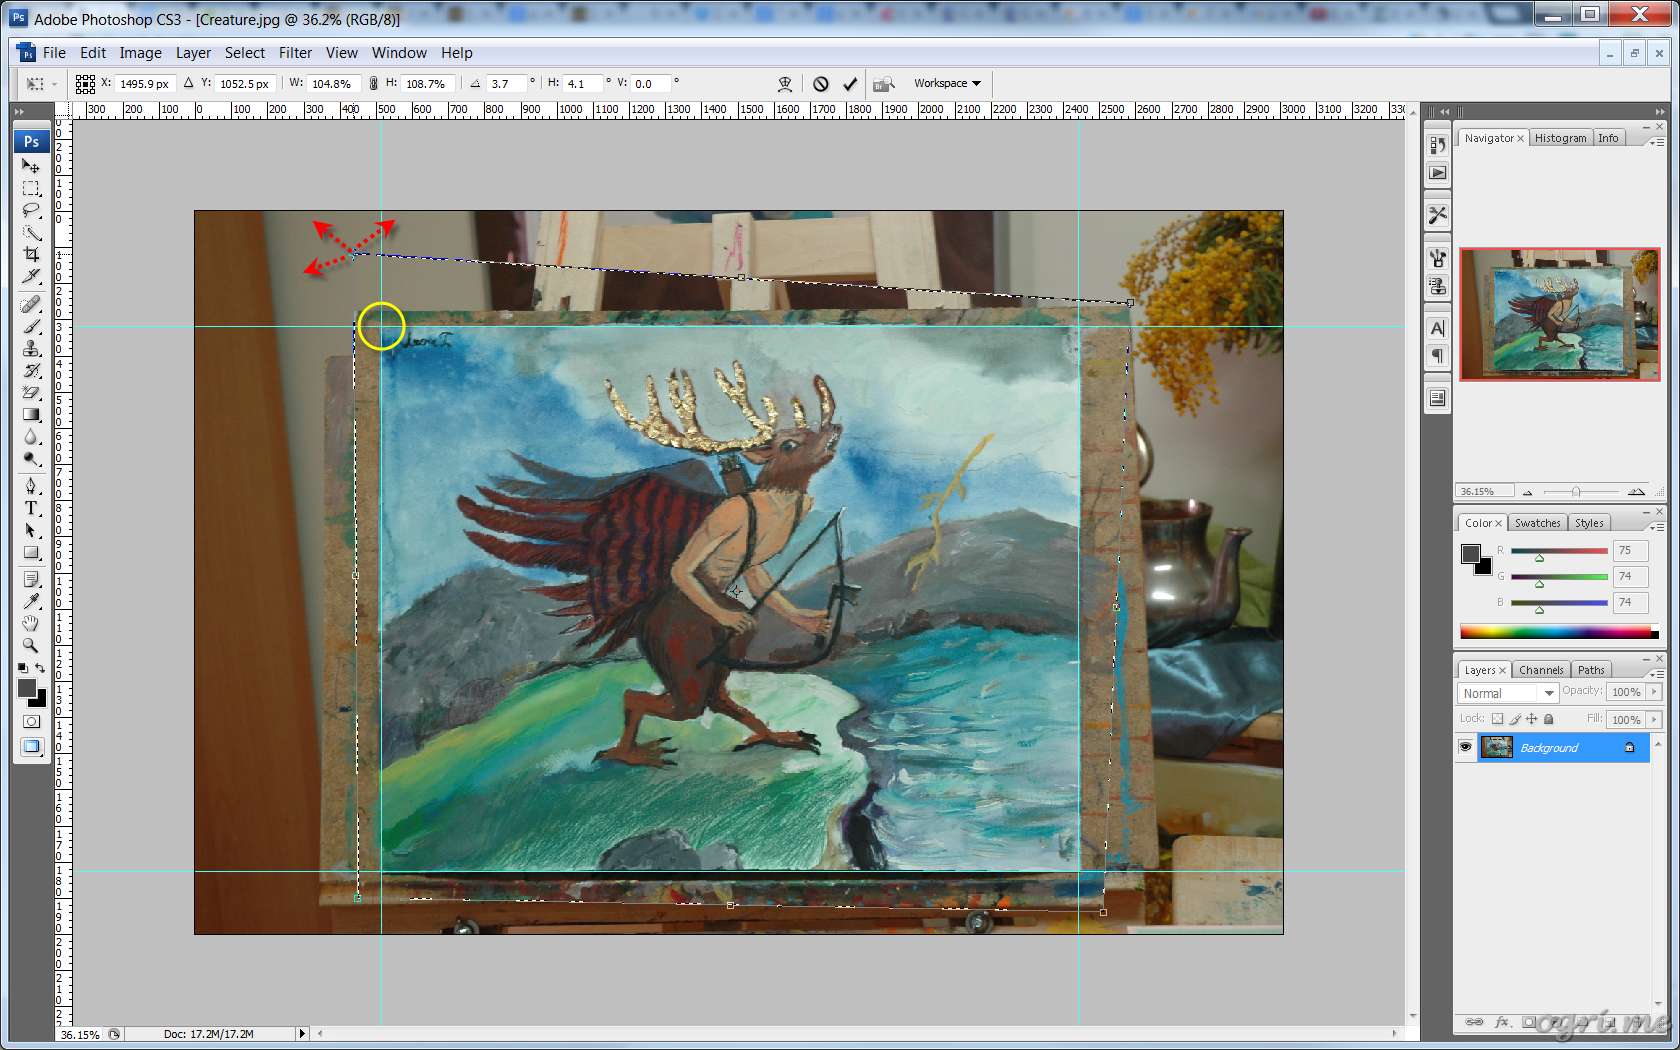
Painting thus takes a rectangular shape. However, in some places, it may still be curved:

One would, of course, pull out the bottom line beyond the limits of the blue rectangle. But after all we like to preserve every part of the painting as it's possible as well as to remove the deformation, leading to an image, which is closest to the original. So, let's use more delicate instrument.
Again, right click and choose Warp (Edit > Transform > Warp). Now, clicking in the right places within the selected area, you can locally straighten your image, pulling its parts in and out.
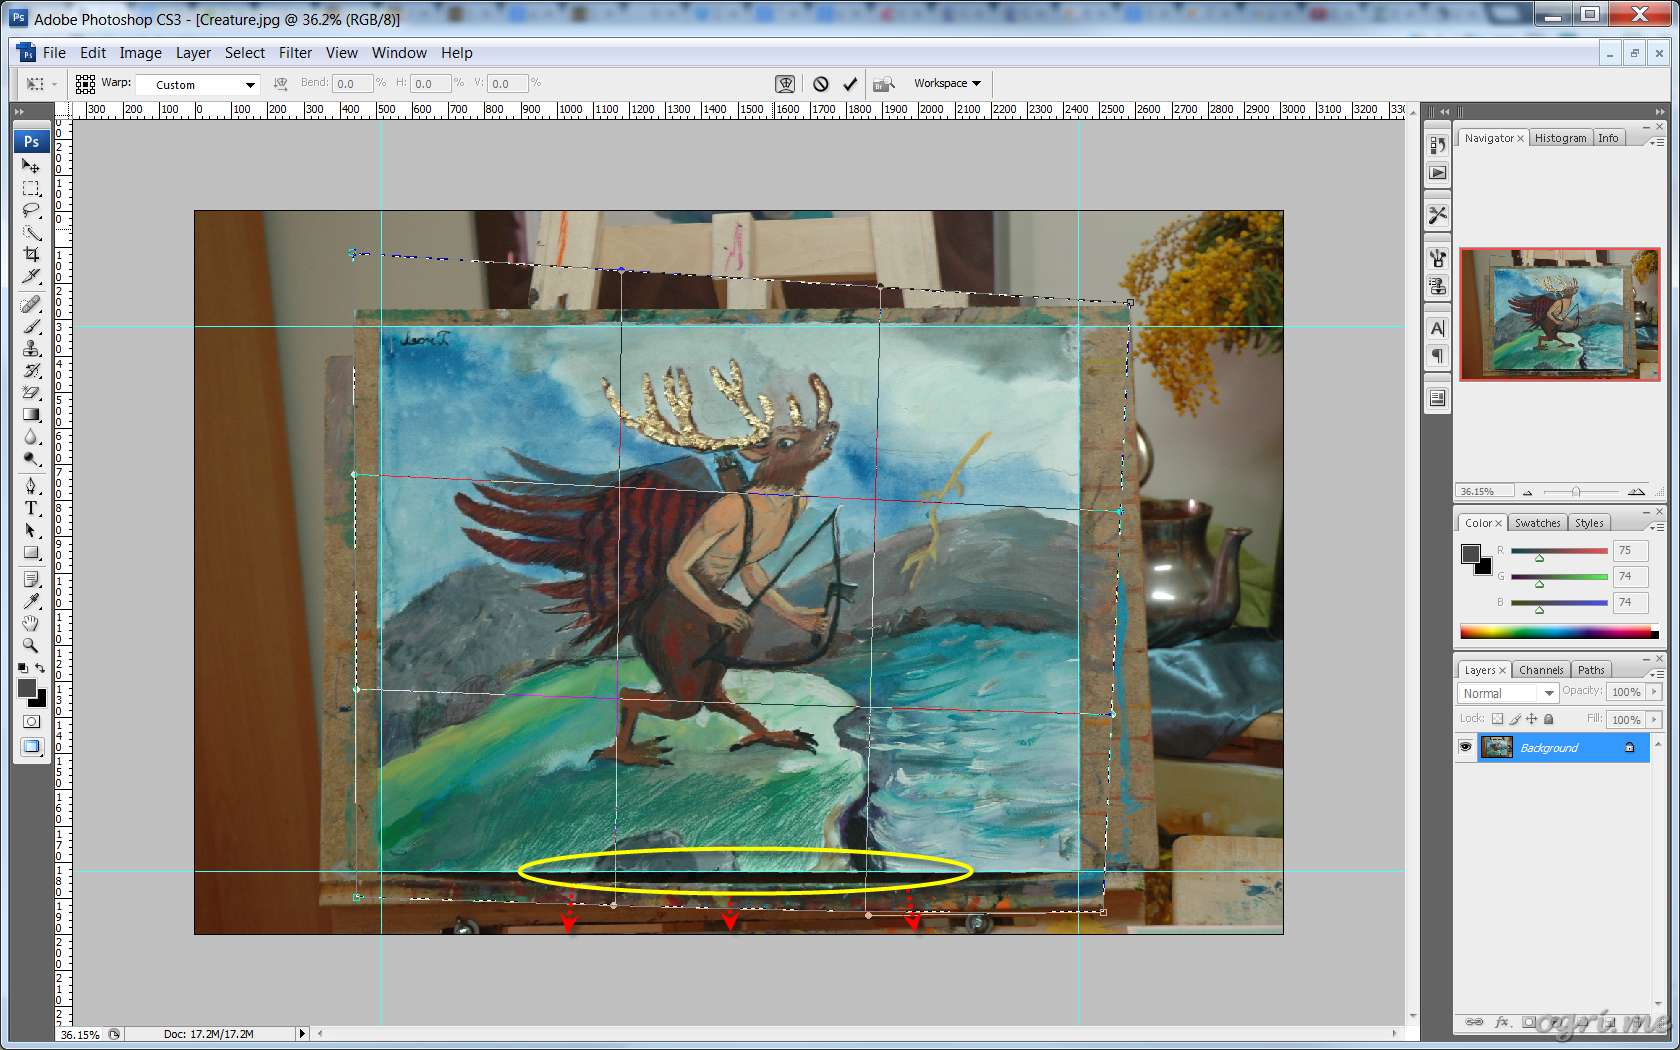
Now that part of the photo which corresponds to our masterpiece of world art, almost perfectly inscribed in a blue rectangle, click again on the Rectangular Marquee Tool. Accept the proposal to keep the transformation by clicking Apply:
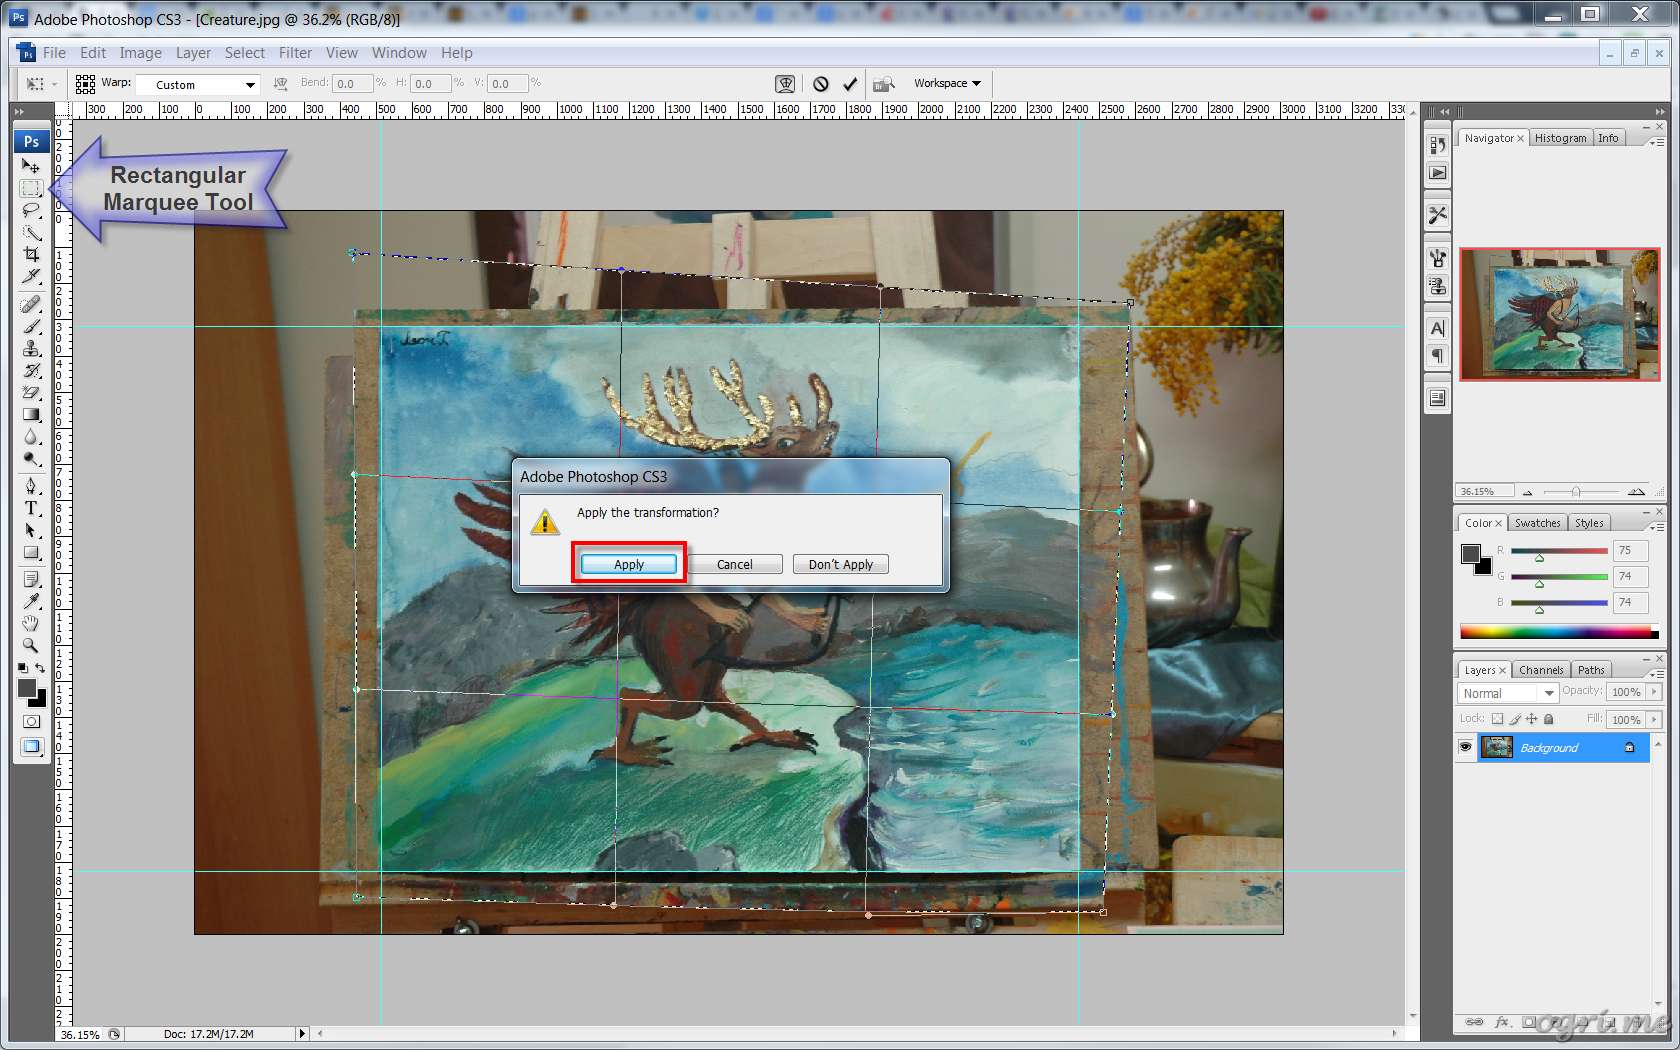
Next, remove all unnecessary from the image - namely, the parts which are beyond the painting itself. Click anywhere on the image to reset the previous selection, then highlight the area just on the sides of the blue rectangle. Then go to the main menu and select Image - Crop.
Adjust your picture to the proportion corresponding to the original. At the same time resize it to the final dimensions. Original in my case has the proportion of 4:3, I post such images on my site in full size of 1600x1200. Let me illustrate the process with the screenshot, where three dialog boxes correspond to the three stages of editing the options:
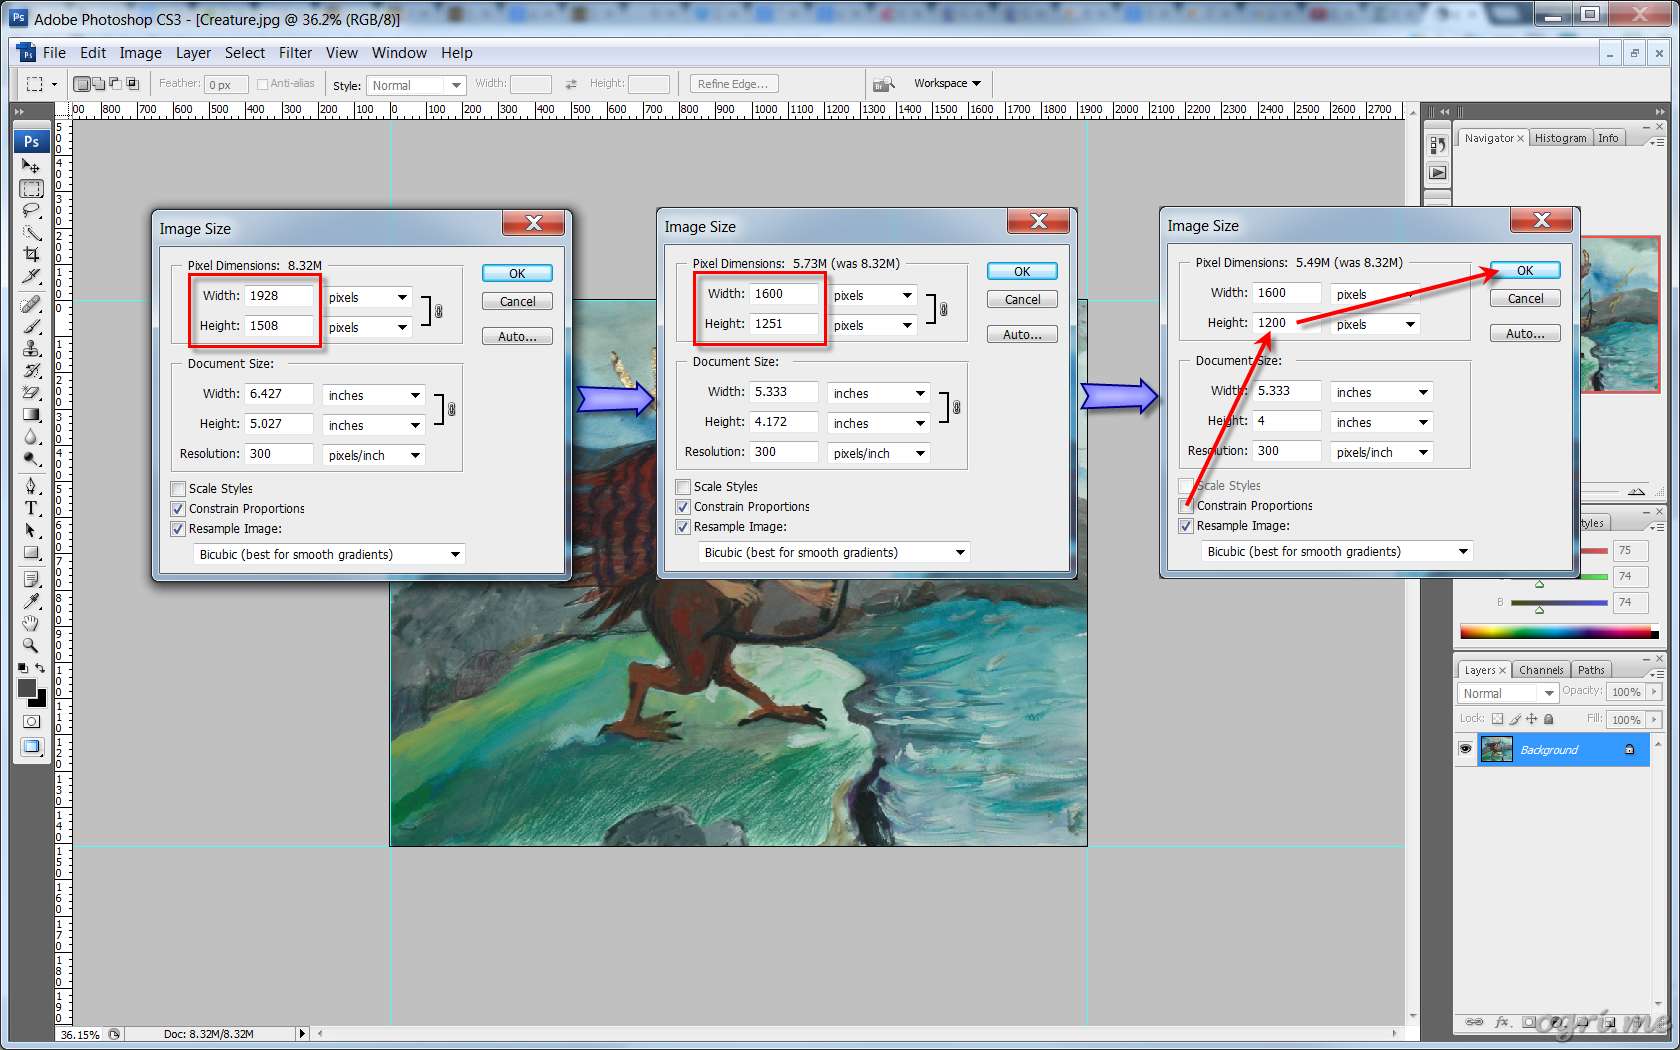
In the main menu, go to Image > Image Size (Ctrl+Alt+I). In the resulting dialog box you can see the image current size (dialog 1). Set image width to desired 1,600 pixels, and since the Constrain Proportions checkbox is active, the height will get adjusted in accordance with the width (dialog 2). But there's still no correspondence with the original proportion - picture is a bit stretched in height. Therefore uncheck Constrain Proportions and specify the desired width and height, and then click OK OK (dialog 3).
Adjust picture's colors. At first you might trust automation and choose Image > Adjustments > Auto Levels (Ctrl+Shift+L). Sometimes Photoshop does it well; in this case, however, colors became somewhat acid:

One could certainly customize the algorithm of automatic correction, but you can also tune the color levels manually. So press Ctrl+Z and open the interface of manual color adjustment - Image > Adjustments > Levels (Ctrl+L). In the Input Levels section see a graph. The easiest thing could be done - remove segments outside the filled area: the so-called "noise". As you can see, the left slider is black; while moving it to the right, dark tones are getting even darker. As for the right white slider, it's all inversely (Preview is turned on). There is also gray slider, it corresponds to the level of mid-tones and moves when you drag the two mentioned above.
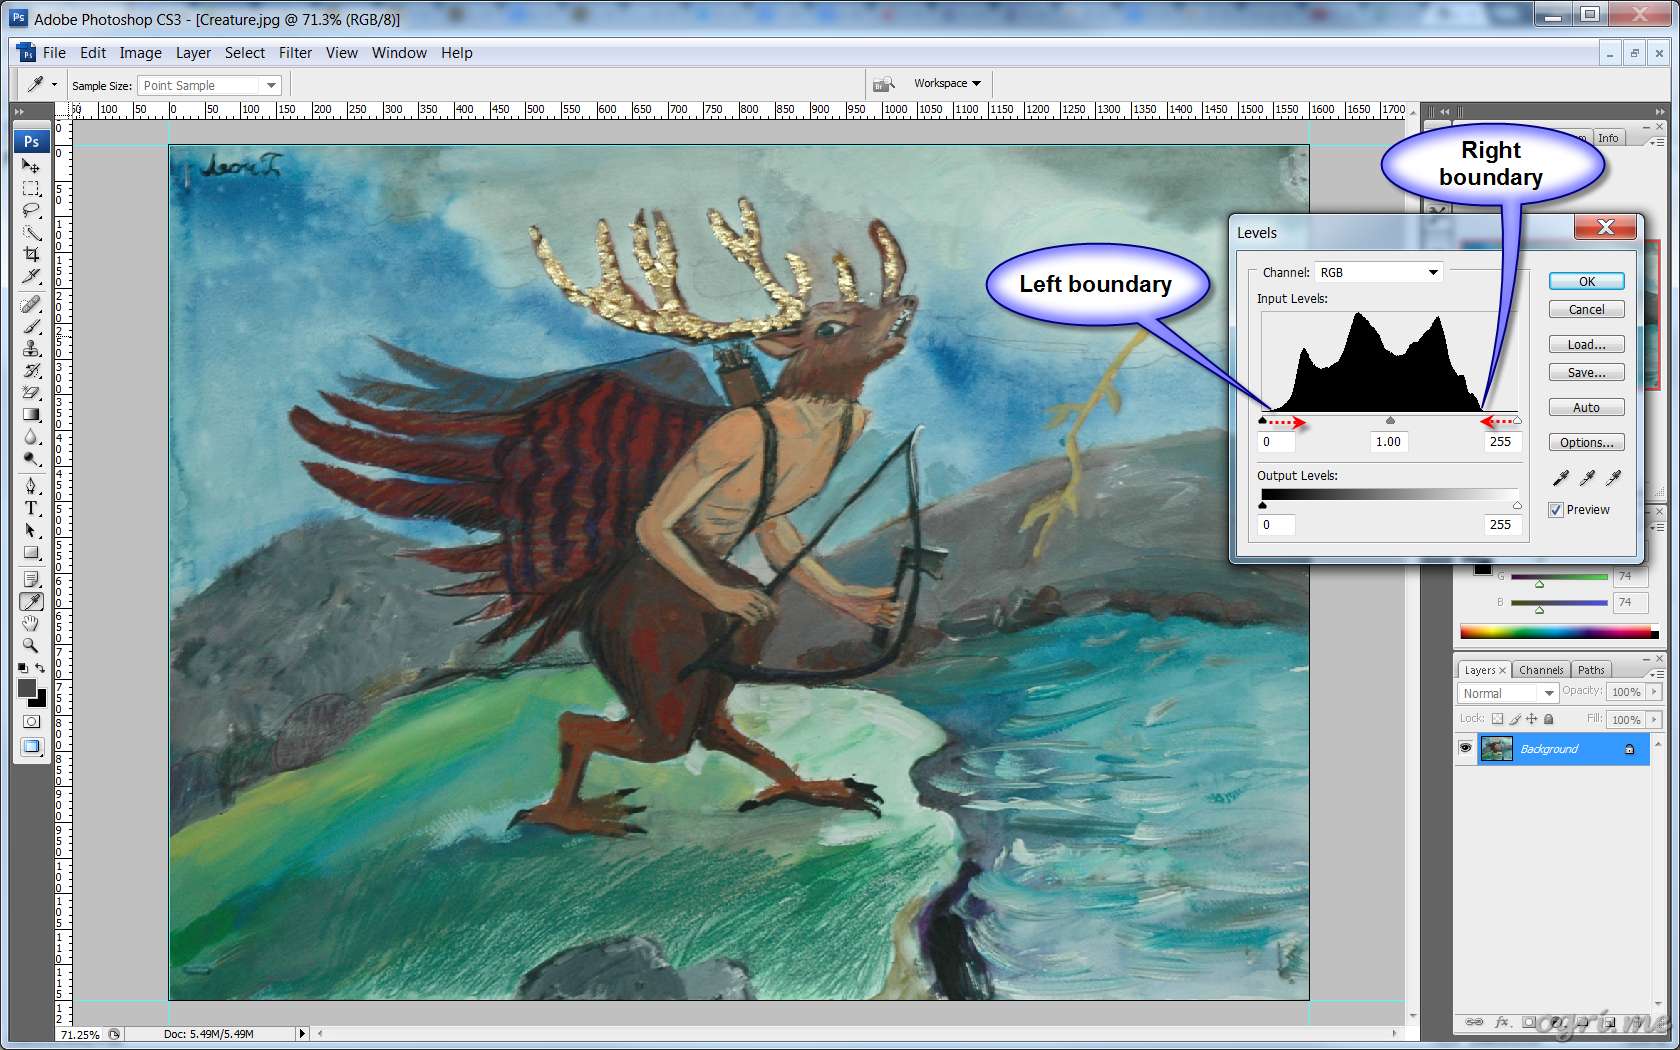
In fact, it's quite sufficient to mindlessly drag two outer sliders to the area boundaries, but you can even try to move beyond them, if the result will be better match the original or your perception. You might also move the gray one for independent adjustment of the mid-tones. Finally, you can also play with the Output Levels, thereby fine-tune the brightness and contrast, but I tend to be satisfied by moving sliders in the Input Levels. Best is the enemy of the good, isn't it? So click OK and get the almost final result. You can save it to a file.
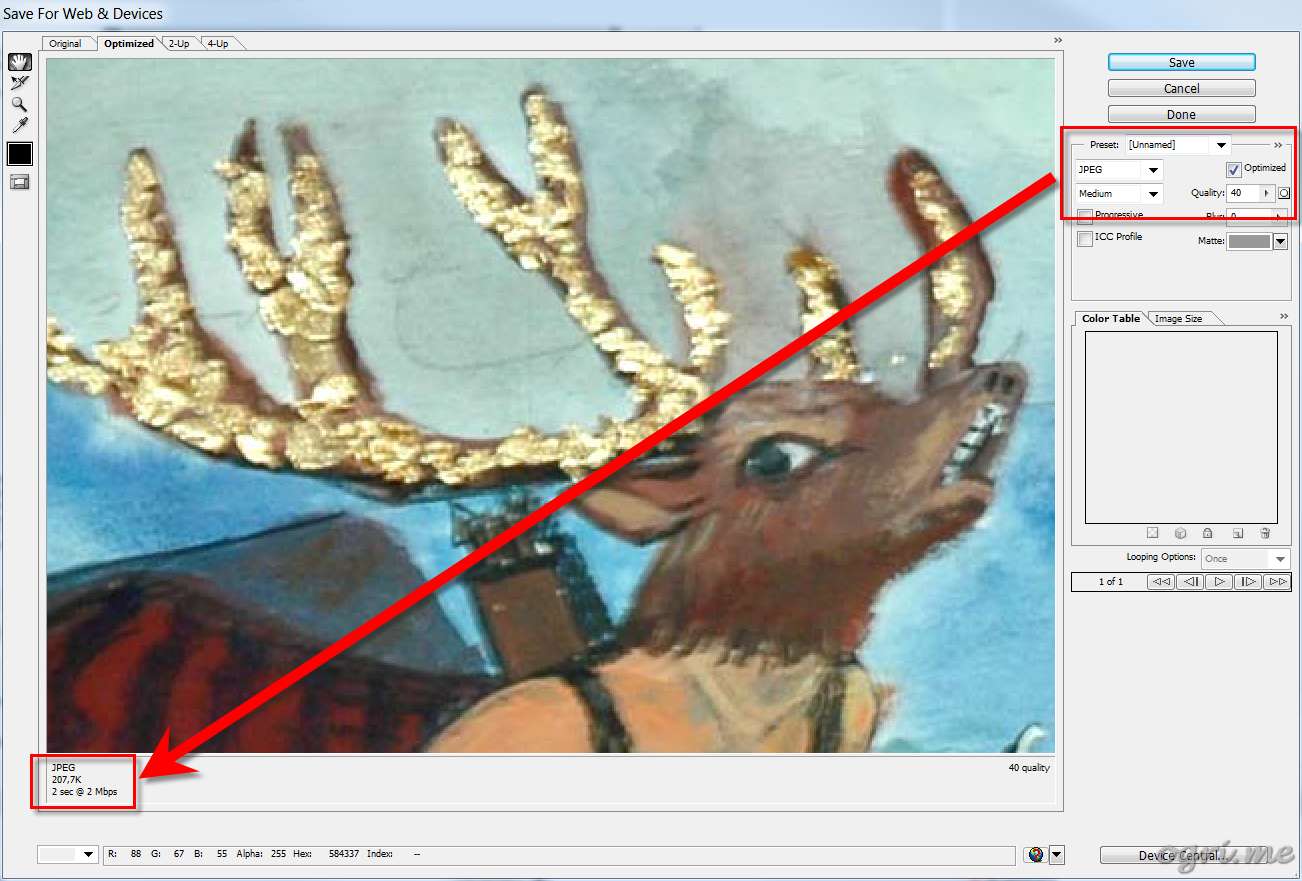
What is left to do? Only to prepare the image for uploading to the web. Its size is still large. The standard way in Photoshop - go to File > Save for Web & Devices (for maniacs who prefer to memorize keyboard shortcuts, or just for the owners of a good memory - as much as Ctrl+Shift+Alt+S). The corresponding dialog pops up on the screen:
In the Preset section you can select one of the preset choices in the title drop-down, or manually adjust the settings. Fine-tuning is effected by changing the value of the Quality input box.While doing so, in the bottom left you can see the size of the image file corresponding quality settings. The picture also dynamically changes as you change the settings. Choose an acceptable balance between size and quality, and then click Save. The picture is ready now, you can post it on your hosting and boast to the internet public about the Louvre on your website.
-
Tuesday, 21 July 2020 03:18
Joomla 3: Redirect to same page after successful login -
Saturday, 30 December 2017 16:11
Joomla: how to add your own language constants or override existing ones -
Thursday, 30 November 2017 23:27
Joomla: Integrate reCAPTCHA v2 (NO CAPTCHA) into JComments -
Saturday, 25 June 2016 15:33
Unified filtering of mod_jcomments_latest module's output -
Thursday, 17 September 2015 16:23
Post an illustrated Joomla-site article on Facebook using OG-tags
- Migrating from Joomla 1.5 to Joomla 2.5. Part 2-1. Transferring jDownloads and jComments
- Joomla: Integrate reCAPTCHA v2 (NO CAPTCHA) into JComments
- Migrating from Joomla 1.5 to Joomla 2.5. Part 2-2. Template, editor, and other extensions
- Custom 404 error page in Joomla 2.5
- Editing animated GIF-images in Photoshop CS3
-
Custom 404 error page in Joomla 2.5
-
 02.11.2020 08:17
Noot spamming but wanted to say this is hugely useful!
02.11.2020 08:17
Noot spamming but wanted to say this is hugely useful!
-
-
Joomla: Merge two sites into one using component J2XML
-
 24.08.2020 03:52
you are in point of fact a excellent webmaster. The web site loading pace is incredible. It kind ...
24.08.2020 03:52
you are in point of fact a excellent webmaster. The web site loading pace is incredible. It kind ...
-
-
Joomla: how to add your own language constants or override existing ones
-
 29.10.2020 11:33
Is this a free template that you are using as I really love it. As a website desugner myself I hope that ...
29.10.2020 11:33
Is this a free template that you are using as I really love it. As a website desugner myself I hope that ...
-
 02.10.2020 00:07
Love this site keep up the good work!
02.10.2020 00:07
Love this site keep up the good work!
-
-
Migrating from Joomla 1.5 to Joomla 2.5. Epilogue
-
 11.02.2021 06:17
HELP. I can't write a comment without the page freezing.
11.02.2021 06:17
HELP. I can't write a comment without the page freezing.
-
-
Migrating from Joomla 1.5 to Joomla 2.5. Part 2-1. Transferring jDownloads and jComments
-
 14.12.2020 08:49
I cant stomach this person so sorry x
14.12.2020 08:49
I cant stomach this person so sorry x
-
 30.10.2020 15:43
Once again, great resource for us newbs.
30.10.2020 15:43
Once again, great resource for us newbs.
-
 30.09.2020 12:58
Is commenting still open?
30.09.2020 12:58
Is commenting still open?
-
 21.08.2020 13:12
Hi, all is going perfectly here and ofcourse every one is sharing information, that's really excellent ...
21.08.2020 13:12
Hi, all is going perfectly here and ofcourse every one is sharing information, that's really excellent ...
-
-
Unified filtering of mod_jcomments_latest module's output
-
 03.12.2021 21:37
This web site definitely has all of the info I wanted about this subject and didn't know who to ask.
03.12.2021 21:37
This web site definitely has all of the info I wanted about this subject and didn't know who to ask.
-
Comments
S H Raza
M F Husain
K G Subramanyan