
Many users being accustomed to Windows XP, after upgrading to Windows 7 or 8 wonder: why do I need the option to run files as administrator if my account is admin as it is? The matter is that Microsoft developers have not provided a regular user accounts, even with the status of "Administrator", with full rights (as it was in XP), in order to prevent a full-fledged launch of programs, among which may be found potentially malicious ones. And the user himself, if he or she is not sufficiently advanced, can make a mess in the operating system if his/her rights to run system commands are unlimited. For advanced ones there is a special account named "Administrator", which is essentially the Super Administrator, in which all of these restrictions are removed. But, unlike WinXP, it is disabled by default. There are several ways to enable the super-admin account, and I will try to describe them here in detail and with clickable pictures.
A few notes:
- The methods which are suggested to consider, work for all OSs listed at the title of this article. The only difference is in step 1 of method 3, but there is a separate article about it, and I mention it below. Screenshots are taken in Windows 8.1.
- Methods 1 and 2 are applicable only for Windows 7 Professional, Enterprise and Ultimate, since in Starter and both Home editions the necessary Microsoft Management Console (MMC) snap-in is unavailable. For Windows 8/8.1 Pro and Enterprise, all three methods work with a bang, but in the "basic" editions the first two methods are not appropriate for the same reason as for the Windows 7. Method 3 is suitable for all versions (except, of course, Windows RT and RT 8.1).
- Also, in Win8/8.1 all actions are carried out in the PC desktop interface using good old technique - via keyboard and mouse. Modern Metro-interface is not used.
The foreword is over. Let's get ready to Rumble!
Method 1: Via the "Local Users and Groups" MMC snap-in.
- Press and hold down the Windows key, and then press R (Win+R). The Run dialog will open.
- In the Open box type the command lusrmgr.msc.
- Click the OK button or hit Enter.
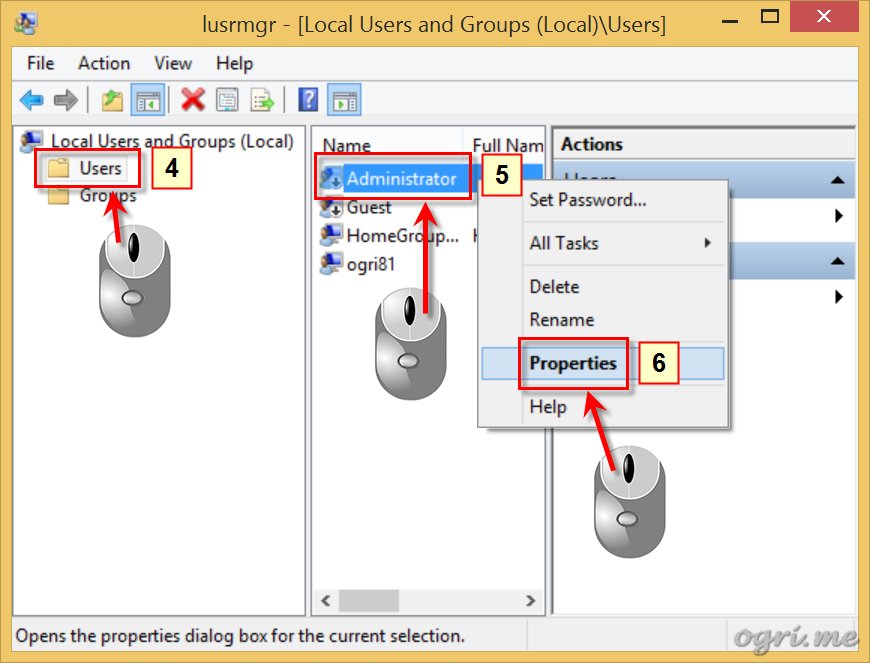
- In the left pane, click on the Users folder. A list of user accounts on your system will open in the center pane.
- Right click on the Administrator account.
- In the popped up menu, select Properties.
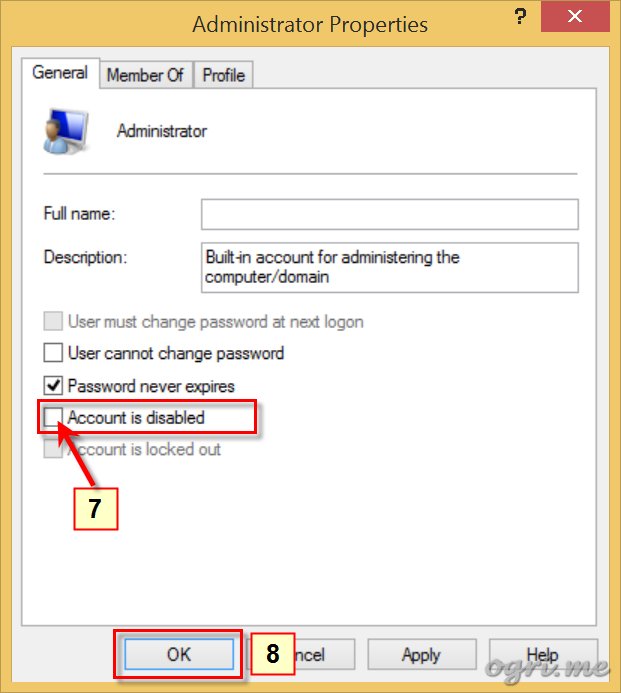
- Staying in the General tab, uncheck the check box Account is disabled.
- Click OK or hit Enter.

A console window containing the above mentioned snap-in will appear.
Dialog box Administrator Properties will appear. There do the following:
Method 2: Using the "Local Security Policy" MMC snap-in.
- Press and hold down the Windows key, and then press R (Win+R). The Run dialog will open.
- In the Open box type the command secpol.msc.
- Click the OK button or hit Enter.
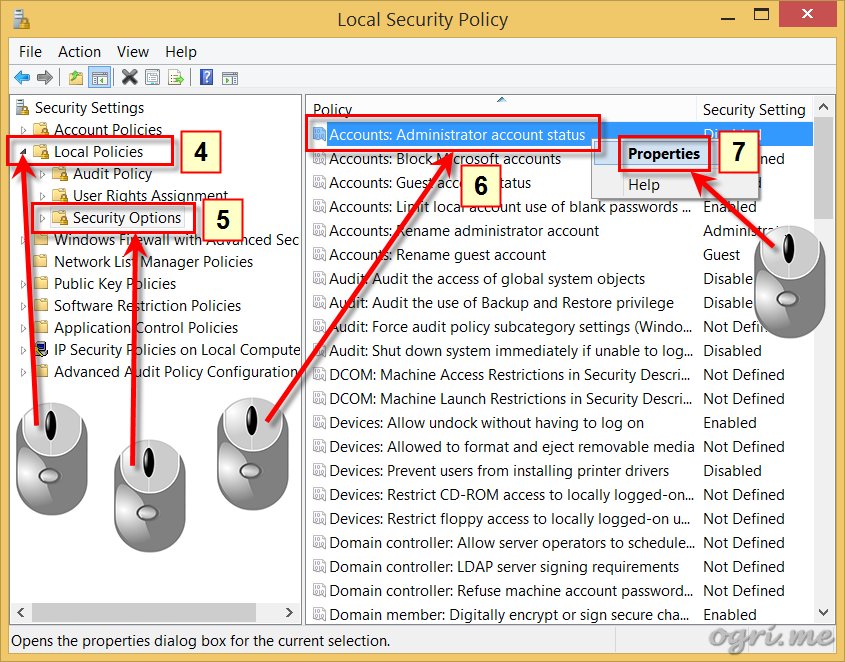
- In the left pane, click on the small triangle to the left of the folder Local Policies (or just double-click on the folder itself). You will see a list of subfolders in this section. The same list will appear in the right pane.
- Click on the Security options in the left pane (or double-click on the same on the right pane). The list of policies should now open in the right pane.
- Find the Accounts: Administrator account status item in the list. Right-click on it.
- Select Properties in the popped up menu.
- Staying in the Local Security Setting tab, select the status Enabled.
- Click OK or press Enter.

The Local Security Policy snap-in will appear.
This opens the status Properties dialog of the 'Administrator' account. There:

Method 3: Via command prompt.
- Open a command-line interface (console window) as an administrator. Since it is used quite often, and besides, is accessed in different ways in Windows 7 and 8/8.1, I have made a separate mini-guide on this issue. See an article How to start a command prompt as administrator in Windows 7, 8, and 8.1.
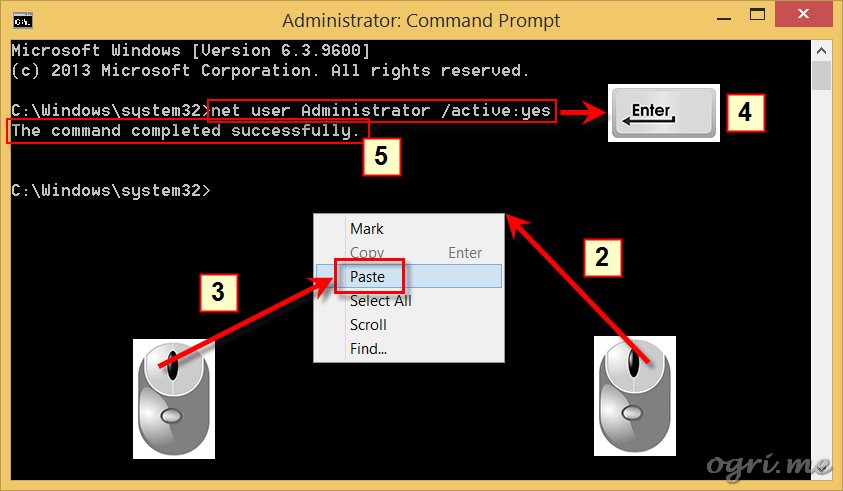
- Right-click anywhere in the console window.
- In the popped up menu, select Paste.
- Press Enter.
- The following message should appear: The command completed successfully.
Now at the command prompt, enter the following command:
For English OS: net user Administrator /active:yes
For other languages, type the administrator account name appropriate for your MUI.
To not to manually enter the entire command, you can copy it to the clipboard directly from the article, and then follow a few steps in accordance with the screenshot:
- To disable the Administrator account, in the command's syntax just change the option yes of the parameter 'active' to no.
- Moreover, from the same command line, you can change the Administrator password by using the command
Couple of notes:
net user Administrator password
with the appropriate parameters.
Thus, the goal in the title was implemented by one of the methods suggested above. If you now log out or reboot, the welcome screen, along with the ordinary user accounts will include the "Administrator" account. Log in and make yourself the owner of your operating system.
Cases where the work from the Super Administrator account can be useful are described in other articles in this site. For example, for the Windows Mail enabling in the same OSs.
In conclusion, I want to mention one important thing. One of the frequently asked questions: whether or not to use Admin as your main account? The answer is - absolutely NOT. The reasons are indicated in the beginning of this article. Therefore, use this option only in cases where a certain problem can not be solved from the regular user account.
-
Saturday, 10 February 2018 18:48
Implementation of Windows Mail into Windows 10 version 1709. MAPI restored! -
Tuesday, 02 January 2018 16:40
Implementation of Windows Mail into Windows 10 version 1709 -
Friday, 18 November 2016 19:14
Reinstall Windows 10 without losing programs and files (Repair install) -
Thursday, 16 April 2015 19:17
Reinstall Windows 7 without losing programs and files (Repair install) -
Wednesday, 07 May 2014 14:08
Enabling Windows Mail in Windows 7 - retrospective review three years later
-
Implementation of Windows Mail into Windows 10 version 1709
-
 05.04.2020 16:16
-
03.04.2020 09:06
Sehr geehrte Damen und Herren, gro├¤artig, dass Sie eine L├Čsung anbieten, mit der ŌĆ×Windows MailŌĆ£ ...
-
-
Implementation of Windows Mail into Windows 10 version 1709. MAPI restored!
-
 15.05.2021 16:31
schick mir ne Mail, auf wolframjahn at t- .... meine Antwort war wohl zu gro├¤, wurde immer als ...
15.05.2021 16:31
schick mir ne Mail, auf wolframjahn at t- .... meine Antwort war wohl zu gro├¤, wurde immer als ...
-
 04.02.2021 09:57
Are the zip archives no longer available? I can't download anything.
04.02.2021 09:57
Are the zip archives no longer available? I can't download anything.
-
 13.01.2021 17:32
Ok I think I fixed it I followed this, but instead of adding to WLM which i don't have i added them into ...
13.01.2021 17:32
Ok I think I fixed it I followed this, but instead of adding to WLM which i don't have i added them into ...
-
13.01.2021 17:20
This is the error It doesn't seem to be able to send or receive emails An unknown error has occurred.
-
13.01.2021 17:19
This is the error It doesn't seem to be able to send or receive emails An unknown error has occurred.
-
13.01.2021 12:22
Hi, Does this work with the latest update of windows 10 I'm having a few issues now since updating ...
-
 02.07.2020 12:35
Hi. I need assistance with step 5 "Copy all files from the SysWOW64 in the archive to the folder ...
02.07.2020 12:35
Hi. I need assistance with step 5 "Copy all files from the SysWOW64 in the archive to the folder ...
-
 01.02.2020 02:08
Thank you for restoring Winmail.
01.02.2020 02:08
Thank you for restoring Winmail.
-
Read more...