ADBLOCK_MSG
Enabling Windows Mail in Windows 7 - retrospective review three years laterPublished: Wednesday, 07 May 2014 14:08 Written by Ogri Hits: 13529
Enabling Windows Mail in post-Vista Microsoft OSs :: CONTENT
Enabling Windows Mail in Windows 7
Enabling Windows Mail in Windows 8
Enabling Windows Mail in Windows 7 - retrospective review three years later
Implementation of Windows Mail into Windows 10 version 1709
Implementation of Windows Mail into Windows 10 version 1709. MAPI restored!
end faq
The guide devoted to recovery of the Windows Mail functionality, which had been disabled by Microsoft in Windows 7, was written more than three years ago, but the problem is still actual for lots of disgruntled users who did not adjust to Windows Live Mail, proposed instead. For those who switched over to Windows 8, and then upgraded to 8.1, I've made ŌĆŗŌĆŗa similar manual for these OSs not so long ago. But Win7 is still good and very popular, and interest in the revival of WinMail under this OS did not decrease lately, but even grown. In the discussion of the article commenters brought up a number of specific problems that have arisen in different editions of the system. As a result of this discussion, some corrections and additions have appeared, and I have the honor to present them to my readers.
Will focus on issues that have arisen and resolved while executing the appropriate steps of the main guide. So, let's begin.
Step 1 - Launch of WinMailEdit.reg
WinMail is being successfully re-enabled even without pre-editing the registry. So what, one may not to run this script? This is not entirely true. WinMailEdit inserts into the registry some keys which add the following improvements in Windows Mail:
- Associates mail files
.emlwith the program. This association allows you to open them by double-clicking or pressing Enter from the file manager. However, for this WinMail has to be set as default mailer program. - Disables the splash screen of WinMail. Insignificant feature, especially knowing that switching the program's splash screen on and off can be independently done with the help of minor registry changes. Here is a script to disable:
And for re-enabling:Windows Registry Editor Version 5.00 [HKEY_CURRENT_USER\Software\Microsoft\Windows Mail] "NoSplash"=dword:00000001
Save each code in aWindows Registry Editor Version 5.00 [HKEY_CURRENT_USER\Software\Microsoft\Windows Mail] "NoSplash"=dword:00000000
.regfile and switch the splash screen on your own. - Removes registry keys that conflict with
msoe.dllof Windows Vista (for x86).
So, the file WinMailEdit.reg is still recommended to be run, especially for owners of 32-bit OS.
Step 2 - Launch of unhide.cmd
unhide.cmd does not work in home editions, if you do not run it as administrator (right click - Run as administrator). Generally, in order to bypass the limitations of the standard account with administrative status (there are a lot of them, despite the status), you can enable the real Administrator account (Super Admin), which is hidden by default, and execute all the steps from this account. As an account, which has full administrative privileges, may have wider utilization, I created a detailed illustrated instruction for its activation - see How to enable the Administrator account in Windows 7, 8 and 8.1. Activate it, log in and work. Only do everything carefully, complete freedom in the possession of the system can lead to unpredictable consequences due to incorrect use of. Microsoft initially disabled this account reasonably. This is sort of a disclaimer.
Now for the WinMail.exe file. I have been repeatedly asked to lay it out for download - some people lost it, probably as a result of improper actions. Below are two links - for x86 and x64:

|
|
| |
Download
|

|
|
| |
Download
|
But there were also cases when the downloaded exe-file could not being copied to the folder Windows Mail. Hidden files are set to be shown, but unhide.cmd did not work for some reason. WinMail.exe is not displayed in the folder, but the system asserts that it is nevertheless there. The point here is that the exe-file originally, in addition to the attribute "h" - Hidden, also has the attribute "s" - System. Even without switching on the option to show hidden and protected system files and folders, you can be easily verify the presence of the file itself, and of both mentioned attributes as well. To do this, go to the command-line interface - see How to start a command prompt as administrator in Windows 7, 8, and 8.1 (in this case administrative privileges are not required though). In the command prompt, type (or paste from clipboard) the following command:
attrib "C:\Program Files\Windows Mail\WinMail.exe"
Double quotes are required. Also, if the letter of your system partition is other than C - replace it with yours.
Press Enter and get the result. If the file exists, the system will return a list of its attributes. In addition to "s" and "h", you can see standard attribute "a" - Archive:
If the file is really gone, the system will report it:
Step 4 - Replacing of msoe.dll
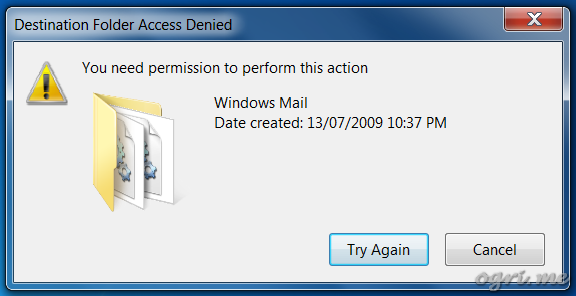
And last but not least. Several people couldn't substitute the inactive dll with working one even after they supposedly became owners through the Take Ownership option. The system demanded permission to copying in the folder by issuing the following message:
It did not work even from Super Admin account. It occurred in Home Basic, but also in the Professional edition, indicating that the problem is not due to limitations in home editions. Manual change of the file permissions resolved this issue. For those who may be faced with something like this in the future, I will describe visually how this is done. Before that, I'd just recommend you to perform the following instructions from the mentioned Super Admin account. (The link to its activation guide is in the text above.)
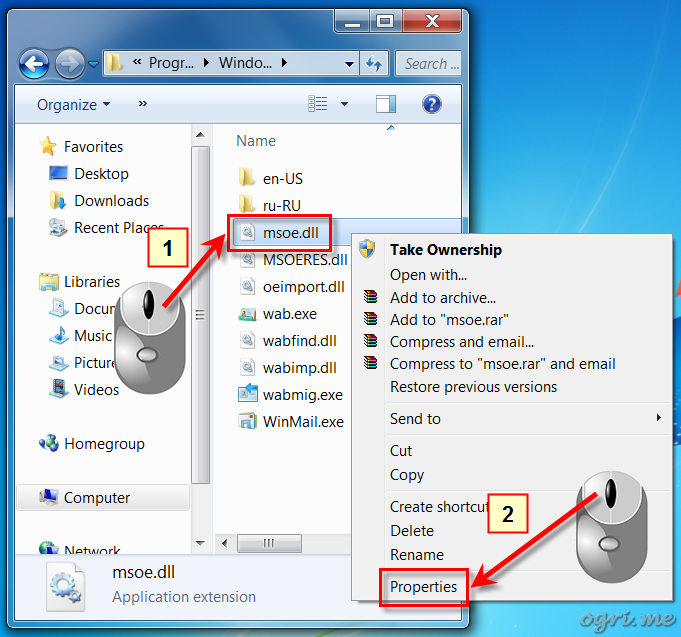
- Right click on the
msoe.dllfile. - In the popped up menu, select Properties.
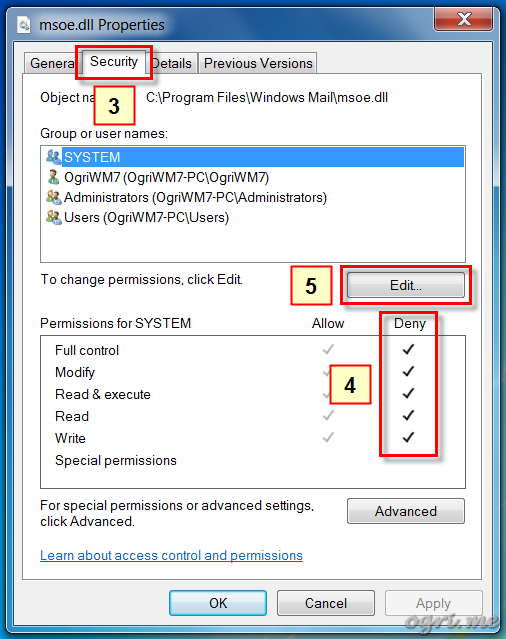
Dialog box msoe.dll Properties will appear. There do the following:
- Click on the Security tab, that brings the tab panel to the front.
- In the section Permissions for you can find a list of actions with the dll, granted or denied by the system for each group or user. Check marks indicate the current permission for each action. Your goal is - to assign the maximal privileges.
- Click the Edit button.
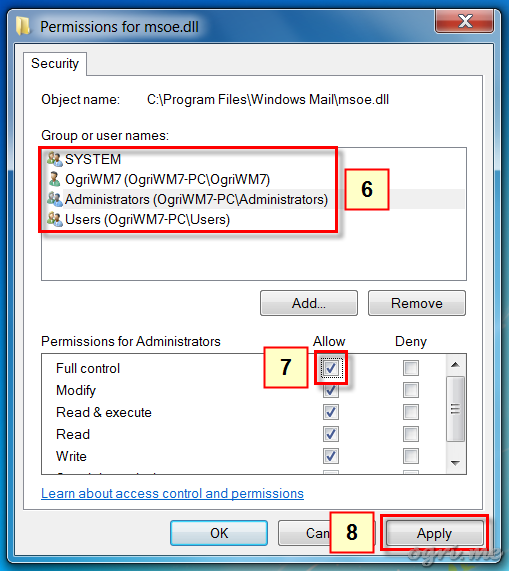
This opens the Permissions for msoe.dll dialog window. In there:
- In the section Group or user names click sequentially on each item in the list (except TrustedInstaller).
For each group or user to perform the following steps:
- Mark the checkbox Full control in the column Allow.
- Click the Apply button.
Then you can close all the dialogs and replace the dll - the system is now allowing you to do this.
Hopefully, those Windows 7 users who failed to reanimate this long-suffering Windows Mail by the main instruction, will now successfully do it.
Latest News
-
Saturday, 10 February 2018 18:48
Implementation of Windows Mail into Windows 10 version 1709. MAPI restored! -
Tuesday, 02 January 2018 16:40
Implementation of Windows Mail into Windows 10 version 1709 -
Friday, 18 November 2016 19:14
Reinstall Windows 10 without losing programs and files (Repair install) -
Thursday, 16 April 2015 19:17
Reinstall Windows 7 without losing programs and files (Repair install) -
Wednesday, 07 May 2014 14:08
Enabling Windows Mail in Windows 7 - retrospective review three years later
Articles Most Read
-
59006
Enabling Windows Mail in Windows 7 -
30827
Reinstall Windows 7 without losing programs and files (Repair install) -
30388
Migrating Windows 2000 / XP to a VMWare virtual machine -
20861
Windows XP Installation: The "34 minutes remaining" syndrome -
18029
How to determine whether my PC is running Windows 8 of 32 bit or 64 bit
Login
Guest Column
Recent comments
-
Implementation of Windows Mail into Windows 10 version 1709
-
 Gerd Wrede
05.04.2020 16:16
Sehr geehrte Damen und Herren, das Problem, das ich in meiner Mail vom 03.04.2020 dargestellt habe, ist ...
-
 Gerd Wrede
03.04.2020 09:06
Sehr geehrte Damen und Herren, gro├¤artig, dass Sie eine L├Čsung anbieten, mit der ŌĆ×Windows MailŌĆ£ ...
-
-
Implementation of Windows Mail into Windows 10 version 1709. MAPI restored!
-
 Wolfram
15.05.2021 16:31
schick mir ne Mail, auf wolframjahn at t- .... meine Antwort war wohl zu gro├¤, wurde immer als ...
-
 Michael
04.02.2021 09:57
Are the zip archives no longer available? I can't download anything.
-
 Mike
13.01.2021 17:32
Ok I think I fixed it I followed this, but instead of adding to WLM which i don't have i added them into ...
-
 Mike
13.01.2021 17:20
This is the error It doesn't seem to be able to send or receive emails An unknown error has occurred.
-
 Mike
13.01.2021 17:19
This is the error It doesn't seem to be able to send or receive emails An unknown error has occurred.
-
 Mike
13.01.2021 12:22
Hi, Does this work with the latest update of windows 10 I'm having a few issues now since updating ...
-
 Ronald
02.07.2020 12:35
Hi. I need assistance with step 5 "Copy all files from the SysWOW64 in the archive to the folder ...
-
 kevin Malcolm
01.02.2020 02:08
Thank you for restoring Winmail.
-


Comments
Just remember that after some Windows 7 updates WinMail may reset to its disabled state. If you don't find it one day, just re-enable it the same way. Fortunately, this happens rarely.
Good luck with your new OS!
I just wanted to say that after I ran the registry files, I just took ownership of the whole Windows Mail folder and deleted it, and copied in the one from Vista. The one from Vista had some other files in it that I assumed were updates that were given in Vista but would never be available in Win 7. It worked great.
I also wanted to comment that you can also transfer all your emails by showing hidden folders and through the "appdata" folder in the user folder...local....Microsoft....Windows Mail. Then just copy and paste the "local folders" into the same folder in Win7. Also in this "local folders" folder was my parents account info for pop server, it was an OEACCOUNT file. So by copying it over I just had to log into the service.